The Properties command is available from the shortcut menu and is used to edit picture properties.
Select a picture or picture merge code, then right-click to open the shortcut menu.
To select a picture, you can double-click on the image, right-click on the image, or press the [Shift]+[arrow] keys.
Click Properties. The Picture properties pop-up window opens.
Make changes to the following fields, if necessary:
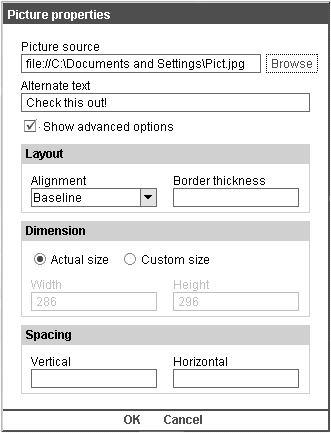
Picture source - navigate to a new path on your computer to locate a picture file. Type in the field, or click Browse to select the path.
Alternate text - modify the text string that will appear in lieu of the picture, should the email recipient not be able to view the inserted picture.
Show advanced options - select this check box to display the rest of the window (as seen above). If the check box is NOT selected, the Layout, Dimension and Spacing sections of the window will be hidden from view.
In the Layout section:
Alignment - click the drop-down list and select the type of alignment option you want for the picture.
Border thickness - specify (in pixels) the thickness of the border around the picture by typing in the text box.
In the Dimension section:
Actual size - if you select this option, the Width and Height settings (in pixels) of the picture are displayed.
Custom size - select this option and specify a custom Width and Height (in pixels) for the picture.
In the Spacing section:
Vertical - specify (in pixels) the amount of space across the top and bottom sides of the picture.
Horizontal - specify (in pixels) the amount of space along the left and right sides of the picture.
Click OK.
NOTE: You can delete a picture by clicking either the [Delete] or [Backspace] keys to remove the image, just like you would a character.